


.jpg)


.jpg)


.jpg)


.JPG)


Persian Army - Blue (Mardonius)
Right Wing: Thebans and Medizing Greeks
- Four units of 36 Militia Grade Hoplites in three ranks
- One unit of 12 Thessalian Militia Grade Medium Cavalry
- One unit of 8 Skirmish Slingers
- Three units of 8 Psiloi Skirmish Javelins
- One unit of 48 Militia Grade Indian foot with bows in four ranks
- One unit of 48 Militia Grade Bactrian foot with bows in four ranks
- One unit of 48 Veteran Sakae foot archers in four ranks
- Two units of 8 Veteran Bactrian Light Cavalry with javelins
- Tow units of 8 Veteran Sakae Horse Archers
Centre Left: Persians
- 6 units of 48 Militia Grade Persian foot with spara and bow
- 4 units of 8 Veteran Skirmish Archers
- Four units of 36 Elite Immortals with spara and bow
- Two units of 18 Veteran Medium Cavalry with bows
- Four units of 8 Skirmish Archers
- Mardonius plus 12 Elite Heavy Cavalry with bows
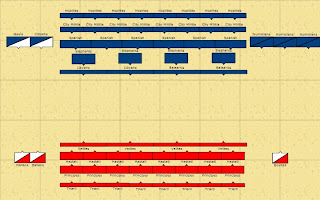
Greek Army - Red (Pausanias)
Left Wing: Athenians and allies
- Two units of 36 Elite Athenian Hoplites in three ranks
- One unit of 36 Elite Plataean Hoplites in three ranks
- One unit of 36 Veteran Megaran Hoplites in three ranks
- One unit of Athenian Archers: 12 skirmishers with bows
- Three units of Psiloi: 8 skirmishers with javelins
- One unit of 8 skirmish slingers
Centre Left: Mixed Allies
- Three units of 36 Veteran Hoplites in three ranks
- Two units of Psiloi: 8 skirmishers with javelins
- One unit of 8 skirmish slingers
- Three units of 36 Veteran Hoplites in three ranks
- Two units of Psiloi: 8 skirmishers with javelins
- One unit of 8 skirmish slingers
Right Wing: Spartans (Pausanias)
- Two units of 36 Legendary Spartan Hoplites in three ranks
- Two units of 36 Elite Perioikoi Hoplites in three ranks
- One unit of 36 Veteran Tegean Hoplites in three ranks
- Three units of Helots: 8 skirmish javelins
- Two units of Helots: 8 skirmish slingers
- One unit of 12 skirmish slingers
Scenario Notes
Persian Infantry with Spara
These deny enemy depth bonuses, but do not receive it themselves. It takes a turn with no movement for them to plant their large shields; thereafter, the full first two ranks of massed infantry may fire bows - the traditional Persian arrow-storm. Also, if they are attacked in melee, they fight the first round of combat as one grade better, ie the massed units fight as medium infantry instead of unarmoured lights, and the Immortals as heavy infantry instead of medium. After this initial combat round, assume that the attacking Greeks have broken through the shield barrier and are in amongst the Persians as normal. It takes a full move for the shields to be taken up again. Only the Persian troops may do this - the mixed command at the centre right of the army may not.Mardonius and the Guard Cavalry
These constitute the great man and his bodyguard, which must travel with him. Note that there should be a separate commanding general for the left wing as a whole.
Hoplites
These count as heavily armoured against fire from their front, reducing enemy missile effectiveness by one-third. Note that the Tegeans and Plataeans were not present in quite these numbers, so consider them to be brigaded with some other allies. I just thought it would be nice to make them identifiable. The two central Greek commands deploy as normal as follows:Turn One: 1-2 on a D6
Turn Two: 1-4 on a D6
Turn Three: automatically
The Table-top
Terrain is mostly flat, with a river running partly down the Greek left flank and a hill for the Spartans. The River Asopus is in the Persian left rear. Both rivers are irrelevant in terms of game effect. The Spartans' hill does not reduce movement, but units uphill receive a melee advantage. The game is scaled at 12 feet by six feet for 25mm figures, with a notional figure scale of 1:75.
Army Morale
The Persian host breaks on losing nine of its infantry units. Their Guard Cavalry counts as two units due to the presence of Mardonius. The Greeks break on losing eight hoplite units. Losing Pausanias doesn't count; he is supposed to die bravely! His death might annoy the other Spartans, though...
Historical Constraints and Other Possibilities
The Persians have destroyed the city of Plataea, a staunch Athenian ally, the ruins of which now lie to the left rear of the Greek army. Mardonius, a trusted military commander, had been left behind by Xerxes along with the Immortals, to complete the subjugation of the pesky Greeks. There is no trustworthy record of them as a specific body after this date, so I think it a reasonable assumption that since they were the army's best troops they were located on the left of the Persian army opposite the Spartans. According to Herodotus, the troops in this part of the Persian army were their best, and fought creditably until Mardonius was brought down.The preliminaries to the battle were a long-drawn out affair. Mardonius knew a Greek army was coming in his direction, and retired into the rolling country away from Plataea to take them on his own terms, but he seems to have been shocked at the sheer size of the assembled host - something in the region of forty thousand heavy hoplites plus their attendant psiloi, helots and servants, who probably accounted for at least as many again. Mardonius had better access to water, and also was able to use his own skirmishers and far superior cavalry arm to begin to deny the Greeks. After prolonged skirmishes, the Greeks decided to retire from the heights of the Asopus Ridge on which they were comfortably nestled in a night march back to a more secure source of water for themselves. However, night marches are notoriously risky, and the Greek army became separated into several distinct groups, not helped by the refusal of at least one Spartiate commander to retire in the face of the enemy. Once Mardonius realised that the enemy was retiring, he rushed forward with the elite troops on the left, led by the cavalry, and the rest of the army trailing as if en echelon.
With the arrival of daylight, it became clear to Pausanias of Sparta, overall commander of the Greek army, that the retreat had failed and a fight was imminent. The Spartans took up position on a rising knoll, probably an outcrop or foothill, with the Perioikoi to their left, and the Tegean contingent to their left again. They would patiently have to sit and endure the Persian arrow storm until the other parts of the Greek army were able to retrace their steps. In the meantime, the Athenian contingent had arrived at their designated point with their allies; realising that the battle was about to begin, they advanced against the enemy troops to their front. The so-called medizing Greeks, especially the Thebans, had sworn allegiance to the massive Persian army, but the Athenians and the Plataeans in particular were in no mood for compromise, since both had seen their cities destroyed by the invaders. After a hard fight on this part of the field, the Thebans were routed. In the meantime, Pausanias held his troops in place for as long as he could in the face of the Persian missiles, until the less well disciplined Tegeans decided they had had enough and charged. Pausanias suddenly realised that the omens were right and led the Spartans into the fray. Herodotus praises the bravery of the Persian troops, despite their inferiority in close combat, but when Mardonius was felled by a stone to the head the entire command dissolved in rout. The entire Greek army seems to have surged forward at this point, although it is not known whether their centre ever did actually get to grips with the enemy. The Persian camp was stormed and a great slaughter ensued, with perhaps as many as 50,000 Persians killed in the pursuit.
It is possible for the Persians to win this game. If Mardonius is able to realise quickly enough that his headlong pursuit is about to run into the Spartans, followed by the rest of the Greek army, he can pull his Guard Cavalry out of the front line, thus avoiding his historical fate and the cascade morale disaster it caused. The Thebans might be able to work their Thessalians around the Atheniand flank, which might in turn enable them to even up the fight against the fired-up Elite Athenian hoplites. The centre? Well, that is up to the Dice Gods...
First Mantinea, 418 BCE

Argives, Mantineans and their Allies - Blue
- Argive Logades: 36 Hoplites
- Mantineans: three units of 36 Hoplites (one with the Strategos)
- Arcadians: 36 Hoplites
- Psiloi: three units of 8 skirmishers, one with slings and two with javelins
Centre Right: Argives
- Allies: 24 Hoplites
- Argives: three units of 36 Hoplites (one with Strategos)
- Psiloi: three units of 8 skirmishers, one with slings and two with javelins
Centre Left: Elians
- Three units of 36 Hoplites (one with Strategos)
- Psiloi: three units of 8 skirmishers, one with slings and two with javelins
Left Wing: Athenians
- Aeginetans: 36 Hoplites
- Athenians: two units of 36 Hoplites (one with Laches as Strategos)
- Psiloi: 8 skirmishers with javelins
Athenian Hippeis: Nicostratus
- Cavalry: two units of 12 medium horse
- Archers: 8 skirmish infantry with bows
Spartans, Tegeans and their Allies - Red
- Spartan cavalry: 12 medium horse
- Sciritae: 24 Guard Hoplites with Spartan Strategos
- Brasidas' Mercenaries: 26 Hoplites
- Neodamodeis: three units of 36 Hoplites
- Helots: three units of 8 skirmishers, one with slings and two with javelins
Centre
- Lakedaemonians: three units of 36 Elite Hoplites
- Spartan Hippeis: 24 Guard Hoplites with Agis II
- Helots: three units of 8 skirmishers, one with slings and two with javelins
Right Wing
- Arcadians: two units of 36 Hoplites
- Tegeans: three units of 36 Hoplites
- Spartans/Tegeans: 24 Elite Hoplites
- Spartan cavalry: 12 medium horse
- Tegean Psiloi: three units of 8 skirmishers, one with slings and two with javelins
Guard Hoplites
The Sciritae was an especially elite force originally recruited by Brasidas for his army prior to his death. They and the Spartan Hippeis should have some sort of drill advantage, say the ability to make an extended wheel for no penalty.
The Argive Logades
These hated the other Argives. They were a unit of nobles, and were at loggerheads with the ascendant democratic party in Argos. They still wanted to fight against the Spartan invasion, but were posted with the Mantineans to keep them separate from their ertswhile brethren, and given the position of honour on the extreme right of the army to reflect their status and prowess.
Other Hoplites
I have graded all of these as standard types. The Neodamodeis are an interesting case, because they were emancipated Helots raised and equipped by the state.
Cavalry
Greek horse were not renowned in this period. They certainly should not automatically disorder enemy foot they catch in the flank or rear, as is normally the case under most rules for shock cavalry. Allow any infantry the ability make a test to stand firm against them even if they are caught at such a disadvantage. The presence of some cavalry gives this battle more flavour than a standard hoplite clash. Their loss should cause morale tests as normal under your rules - after all, it is a hoplite commander's worst fear to see the cavalry protecting his flanks evaporate from the field.
Command Control
Each contingent (in both armies) has its own Strategos. In the case of the Spartans, it seems that the Sciritae were led by a sub-commander while Agis II led the elite of the Spartan army in person in the centre. The Tegean elite were fewer in number, and were bolstered with some Spartans to bring them up to strength. They should be led by a Tegean Strategos, and have the position of honour on the right of the infantry line. Their enemies are somewhat more fragmented due to the higher number of contingents. Additionally, the Athenian cavalry, which is massed together, should be led by one of the two Athenian Strategoi present at the battle - they cordially hated each other's guts, in the finest tradition of Athenian democracy. Only the Athenian cavalry should use a standard command radius method - all the others should be limited in what they can do. This is a hoplite battle, and it was crucial for the line to be maintained. I suggest a compromise between absolute rigidity and total flexibility, though, because Agis did at one point contemplate making a risky manoeuvre with his Hippeis. Something like the original Tactica battle-line rules would work well here, forcing the hoplite units in each command to stay with 4" of each other.
The Table-top
This battle takes place on a flat plain bounded on both sides by rising terrain impassable to cavalry and close formation foot. The right flank of the Spartan army and left flank of their enemies rest on a river; beyond that was a well travelled route (one wouldn't grace it with the term "road") that ran parallel to the river between it and the rising ground. You could represent this and the hills for added flavour if you like, although they won't play any part in the battle.
Army Morale
Nice and straightforward: each army has fifteen units of hoplites, so decide on a proportion at which the army breaks, say one-third or one-half. Make sure you do this in advance of the game, though...
Historical Constraints and Other Possibilities
This is a pretty straightforward match. Historically, the Argive Logades crushed the Sciritae and the remaining mercenaries from Brasidas' army. Agis panicked, and seriously considered sending troops from the centre of the line over to the threatened flank, passing behind the Neodamodeis. However, he was cautioned against making such a risky manoeuvre by one of the Spartan elders, who felt that such an innovation risked too much (there was no reserve capable of carrying out something like this). However, the moment passed as the victorious Argive aristocrats pursued too far. The Athenians on the left disintegrated into flight when pressed by the Tegeans and Spartans, which suggests that the elite unit at the end of the Tegean line managed to turn their opponents' flank. The army fled, but not with the horrendous casualties usually associated with the rout of a hoplite army. This in turn suggests that the struggle elsewhere was long and hard, leaving the victors too tired to take advantage. It also implies that the cavalry were ineffective.
Cunaxa, 401 BCE

Army of Artaxerxes - Blue
- Four units of 18 Veteran Light Cavalry with javelins in three ranks
- Sparabara: Four units of 36 Militia Grade Medium Infantry with spears and bows in three ranks
- 12 Veteran Skirmish Infantry with javelins
- 8 Veteran Skirmish Infantry with slings
- Egyptian Marines: 36 Veteran Medium Infantry with spears in three ranks
- Five units of Persians: 36 Veteran Medium Infantry with spears and bows in three ranks
- Two units of 2 Scythed Chariots
- Two units of 12 Veteran Medium Cavalry with spears
Left Wing: Ariaeus
Four units of 36 Sparabara: Militia Grade Medium Infantry with spears and bows in three ranks
Cavalry Column: Cyrus the Younger
Immortals: 18 Elite Heavy Cavalry with lances in a 3-rank column
Centre: Clearchus
- 18 Paphlagonian Superior Veteran Light Cavalry with javelins in three ranks
- Five units of Hoplite Mercenaries: 32 Veteran Heavy Infantry with spears in four ranks
- 12 Psiloi Veteran Skirmish Infantry with javelins
- 8 Veteran Skirmish Infantry with slings
- 32 Spartans: Elite Heavy Infantry with spears in four ranks
- Peltasts: two units of 12 Veteran Light Infantry with javelins
Scenario Notes
Sparabara and Persian Infantry
These deny enemy depth bonuses, but do not receive it themselves. This is a transitional period, in between the older army of spear and bow infantry, and before the attempt to emulate purely spear-armed hoplites as represented by the Kardakes. The Persian infantry in Artaxerxes' army are rated as Veteran; the Sparabara on both sides are Militia Grade.
Egyptian Spearmen
These are the only all-spear infantry unit in the Loyalist army; unlike the Persians and Sparabara, they do receive depth bonus as per the rules.
Scythed Chariots
Cyrus is recorded as having a very small number of these in his army, but they are not mentioned as playing any role in the battle, so I have disregarded them. The Loyalist army does have some, although the Greeks seem to have disposed of them easily enough. I have inlcuded these because they add some colour and because they might hold up some hoplites long enough for the cavalry to get round their flanks. I added them to the command of Tissaphernes so that the player has something other to use than just a couple of small cavalry units.
Spartan Hoplites
The single Spartan unit in Cyrus’ army can wheel 4” instead of the normal 2”. They occupy the traditional place of honour at the rightmost end of the heavy infantry line.
The Hoplites
All of the hoplite units must set up in four ranks.
The Paphlagonians
These constitute the single Light Cavalry contingent in Cyrus’ army. They were particularly well-regarded so I have graded them as superior fighting quality.
Cyrus and his Immortals
Cyrus personally leads his superb Persian cavalry unit in combat, so it counts as having Impetus; he must stay with the unit for the duration of the battle. It counts as an extra command in its own right.
The Table-top
Terrain is entirely flat, with the River Euphrates running down the side on which the Greeks rest their right flank. The river is impassable for the purposes of this scenario. Historically, Cyrus’ army took up less physical frontage than that of his opponents. To make the game playable, I have reduced the size of Artaxerxes’ army, but he will still have an open flank away from the river. The game is scaled at 9 feet by five feet for 25mm figures.
Army Morale
The Loyalists break on losing seven units, not counting Skirmish Infatry or the Scythed Chariots. The Rebels break on losing six units. However, this is a fight for the throne of Persia; should either commander-in-chief die, that side loses immediately.
Historical Constraints and Other Possibilities
Artaxerxes was very well advised by Tissaphernes, a Satrap who had considerable knowledge of Greek military methods. He surmised that the Greeks would be overconfident, and that they would be placed towards the right of the rebel army. He seems to have counselled that the infantry opposite them should withdraw as far as possible so as to avoid contact while the battle was decided elsewhere. This is very difficult to simulate, so I have set up all of the loyalist infantry as far back as possible to try to get the same effect.
Tissaphernes was correct. The Greek hoplites continued after the masses of infantry in front of them, despite having been ordered to turn towards the centre after dealing with any immediate enemy. When he saw what he thought was a Greek triumph, Cyrus charged the centre of the enemy army. Despite some initial success against the weaker cavalry opposite him, the numerical superiority of the enemy army allowed them to surround and kill him, helped of course by the fact that the Greeks were nowhere to be seen by this point. On the extreme left of the Persian army, Tissaphernes scattered the peltasts in front of him, and then simply ignored the hoplites. It is possible that his cavalry moved into the centre to deliver the final blow against Cyrus. It seems that the Great King’s army also ignored the Asian infantry on the open left wing of the usurper’s army. The reason for Artaxerxes’ circumspection and the orders given to the troops facing the Greeks was that he wanted the Greeks alive so he could offer them a job afterwards! He also repaid Tissaphernes by having him murdered - someone that intelligent was obviously too dangerous to have around the place.
Issus, 333 BCE

Army of Darius - Red
Cavalry Wing: Nabarzanes
Persians: four units of 24 Veteran Medium Cavalry in four ranks
Persians: four units of 24 Veteran Light Cavalry with javelins in four ranks
Colonists: four units of 24 Militia Grade Medium Cavalry in four ranks
Centre: Darius
Hoplites: three units of 48 Veteran Heavy Infantry in six ranks
Kardakes: three units of 48 Militia Grade Medium Infantry in six ranks
Kardakes: three units of 48 Militia Grade Medium Infantry in four ranks
Army of Alexander - Blue
Left Wing: Parmenio
Four units of Thessalians: 12 Elite Heavy Cavalry in two ranks
Centre: Nicanor
Phalanx: six units of 32 Veteran Heavy Pikemen in four ranks
Hypaspists: 36 Elite Heavy Spearmen in three ranks
Corinthian League Hoplites: five units of 36 Veteran Heavy Spearmen in three ranks
Right Wing: Alexander
Three units of Companions: 18 Elite Heavy Lancers in three ranks
Scenario Notes
Initial Comments
This scenario is based upon Patrick Waterson’s article in Slingshot 270 (May 2010); thanks are due to Patrick and to Richard Taylor, the journal’s editor, for permissions. I have had to fudge the Persian army in particular in order to make it fit in with our tabletop rules while still presenting a good game.
The Persian Cavalry
I have deployed these as best I can within the limited space available, hence the large columns. In accordance with our tabletop ruleset, I divided the Persian horse into three basic types, all armed with javelins: standard Persian massed horse; standard Persian light horse; and Colonist militia. Only the light horse should be able to use the javelins as missiles, if they get the chance. Experience from our club games shows that a dense deployment such as this is vulnerable to unlucky morale rolls; the contagion of panic can easily spread, as indeed happened to the Kardakes in this battle. So I put the better cavalry in front, with lighter troops in the second wave; the latter should be able to use their mobility to exploit any breakthroughs created by their predecessors. I left the Colonists at the rear because their morale is the shakiest of all, but they should be able to mop up any remaining resistance through sheer weight of numbers. In practice, of course, it will be unlikely for any but the front units to see action.
Darius’ Infantry Deployment
Following the suggestions in Slingshot, next come the mercenary hoplites, deployed deep, and three units of Kardakes, also deployed in columns. The next lot is another three units of Kardakes, this time deployed in a more usual formation. Unfortunately for the Persians, this is exactly opposite the Companions. I have chosen to represent the Kardakes as mediocre spearmen. Patrick does refer to the Greek source saying they fired a smattering of arrows to no avail as the Companions came forward; my own feeling is that this may just be the usual Greek assumption that the Persians have a massive arrow storm, influenced by previous accounts of earlier phases of the Greek and Persian wars. A literary and historiographical convention, then. However, it is easy enough to allow them to have bows while reducing their fighting values to the equivalent of massed light infantry – the points are exactly the same in Tactica II. This will mean that the Companions may well take a few hits from shooting on the way in, but will carve up the Kardakes in quite spectacular fashion once they hit them. I have not represented the troops further upstream, partly because this scenario represents the majority of the close fighting and the point of decision, but also because the number of figures involved would become prohibitive.
The Thessalians
These performed very well against the massed Persian cavalry, so I have classed them as elite heavies.
The Phalanx
Each division of the phalanx was commanded by one of Alexander’s famous officers; Patrick’s article gives the details. For purposes of the tabletop game, I have placed them under Nicanor, who was in direct command of the Foot Companions (Hypaspists). The latter unit comprises the link between the phalanx proper and the Companion cavalry. I agree with Patrick that the Hypaspists should not be pikemen at this date. The Corinthian League troops form a second line, and should be able to counter any Persian cavalry breakthrough that might occur. In a straight historical refight, they will probably see no action.
The Companions
All three units fight in offensive columns to simulate the wedge formation. Unlike the Persian columns, which simply provide massive numbers, the Companions count the front two ranks in combat. This gives them huge combat power on a narrow frontage. The middle unit should be led by Alexander in person, and gains three bonus combat dice as a result.
The Table-top
Terrain is entirely flat, apart from the river behind which the Persians are deployed. This does not seem to have bothered the Companions very much, although it may have slowed down the heavy infantry. I would suggest that it counts as taking 2” from unit movement, but is not a sufficient barrier to merit a combat modifier as well. Darius placed the Persian levies further upstream, where steeper banks provided a natural obstacle; Alexander simply screened them with the Prodromoi and light troops. The game is scaled at 6 feet deep by six and a half feet wide for 25mm figures. If you want to have slightly wider gaps between units, just increase the width to seven feet.
Army Morale
The Persians break on losing eight units, not counting the light horse. The Macedonian army routs if it loses nine units. Also, this is a fight for the throne of Persia; should either commander-in-chief die, that side loses immediately.
Historical Constraints and Other Possibilities
Alexander advanced all along the line. The Thessalians halted on their side of the river. The phalanx engaged the mass of infantry to their front, holding them in place as the Companions launched their assault on the more shallow Kardakes, routing them and then turning into the flanks of the deep infantry columns. It would seem that the Persian cavalry commander Nabarzanes saw these developments and launched an attack of his own, which the Thessalians managed to contain long enough for the Persian infantry to dissolve in rout, followed by the rest of the army.
The space constraints and relative deployments make other possibilities unlikely. Nabarzanes could be much more offensive with his cavalry, hoping to break the Thessalians early on and threaten the left flank of the phalanx, which would in turn force Alexander to commit the reserve hoplites. Barring the death of Alexander, however, even this is not likely to result in Persian victory. The Persian army deployment seems sensible if one assumes that Alexander would do the same as Darius and place his cavalry downstream. Alexander, of course, did no such thing.
Hydaspes, 326 BCE

Army of Poros - Blue
Left Wing
Chariots: three units of 3 Elite Chariots with missiles
Cavalry: two units of 18 Massed Militia Grade Light Cavalry
Centre
Escort Infantry: three units of 8 SI javs
Elephants: three units of 3 Elephants with missiles
Foot: three units of 48 Militia Grade Medium Infantry with Bows in four ranks
Right
Escort Infantry: three units of 8 SI javs
Elephants: three units of 3 Elephants with missiles
Foot: three units of 48 Militia Grade Medium Infantry with Bows in four ranks
Reserve
Poros with one unit of 2 Elephants with missiles
Army of Alexander - Red
Right Wing: Alexander and Kleitos
Alexander's Companions: 18 Guard Heavy Lancers in three ranks
Companions: two units of 18 Elite Heavy Lancers in two ranks
Sogdians and Bactrians: two units of 8 Light Cavalry with Javelins
Dahae and Sakae: two units of 8 Light Cavlry with Bows
Centre Right: Krateros
Hypaspists: 48 Elite Heavy Pikemen in four ranks (Seleukos)
Phalanx: two units of 32 Heavy Pikemen in four ranks
Agrianes: two units of 8 Elite SI with Javelins
Archers: four units of 8 SI Bows
Centre Left: Meleager
Phalanx: three units of 32 Heavy Pikemen in four ranks
Greeks: Attalos and Gorgias
Hoplites: 36 Heavy Spearmen in three ranks
Thracians: 18 Superior Light Infantry in two ranks with javelins
Cavalry: 18 Heavy Cavalry in two ranks
Scenario Notes
Terrain
There isn't any. Rather, to be precise, off to the Indian left is an area of muddy going leading to the river itself, which is in full spate due to the monsoons. And off to their right the ground rises perceptibly. The battle takes place in between so, yes, this is another of those ancients battles on a billiard table. To make it more interesting, though, you could model the features I have left off-table for the purposes of my deployment map.
Army Morale
The Indians break on losing nine units, not counting the escort infantry. The Macedonian army routs if it loses six units.
Historical Constraints and Other Possibilities
The Indian deployment presents a historical problem, because it means that all of the elephants are facing Alexander's tough infantry, with their supporting archery occluded. Presumably the torrential rain followed by extreme humidity had something to do with it, but it does leave something of a problem for the historical gamer. If you play the scenario as is, it is almost impossible for the Indians to win, which is itself something of an object lesson, and this is indeed how I have set up the scenario, barring the supposed wide sweeping cavalry moves that may have preceded the main event. Given the historically-based army breakpoints, all the Macedonians have to do is wipe put the vastly inferior enemy chariots and cavalry along with some of the elephants.
To make it much more of an even game, however, try the following suggestion, which is based on some of the ideas of Jeff Jonas in an article on the Indian army at the Hydaspes in Slingshor 297. Although the Indian army command structure is as suggested, it is possible that the Indians conceived of their elephants, escorts and associated blocks of foot archers as something like combined arms divisions - certainly, this is very much the case in the later Mauryan armies associated with Chandragupta. In other words, the centre and right of the Indian army is composed of six 'units' comprising one of escorts, one of elephants and one of foot. Therefore, an elephant unit will not count towards the army breakpoint until its supporting infantry is also destroyed. This does mean that the Macedonians will have to engage at least some of the foot archers, but it should make the scenario a more balanced gaming experience. Other possibilities would be not to include the Indian cavalry in their army breakpoint and/or give the elephants automatic impetus in their initial attack on the Macedonian infantry.
Whatever you do, this should be one spectacular looking battle.
Heraclea, 280 BCE
 Army of Pyrrhus (Blue)
Right Wing
Bagradas, 255 BCE
Issus, 333 BCE

Army of Darius - Red
Cavalry Wing: Nabarzanes
Persians: four units of 24 Veteran Medium Cavalry in four ranks
Persians: four units of 24 Veteran Light Cavalry with javelins in four ranks
Colonists: four units of 24 Militia Grade Medium Cavalry in four ranks
Centre: Darius
Hoplites: three units of 48 Veteran Heavy Infantry in six ranks
Kardakes: three units of 48 Militia Grade Medium Infantry in six ranks
Kardakes: three units of 48 Militia Grade Medium Infantry in four ranks
Army of Alexander - Blue
Left Wing: Parmenio
Four units of Thessalians: 12 Elite Heavy Cavalry in two ranks
Centre: Nicanor
Phalanx: six units of 32 Veteran Heavy Pikemen in four ranks
Hypaspists: 36 Elite Heavy Spearmen in three ranks
Corinthian League Hoplites: five units of 36 Veteran Heavy Spearmen in three ranks
Right Wing: Alexander
Three units of Companions: 18 Elite Heavy Lancers in three ranks
Scenario Notes
Initial Comments
This scenario is based upon Patrick Waterson’s article in Slingshot 270 (May 2010); thanks are due to Patrick and to Richard Taylor, the journal’s editor, for permissions. I have had to fudge the Persian army in particular in order to make it fit in with our tabletop rules while still presenting a good game.
The Persian Cavalry
I have deployed these as best I can within the limited space available, hence the large columns. In accordance with our tabletop ruleset, I divided the Persian horse into three basic types, all armed with javelins: standard Persian massed horse; standard Persian light horse; and Colonist militia. Only the light horse should be able to use the javelins as missiles, if they get the chance. Experience from our club games shows that a dense deployment such as this is vulnerable to unlucky morale rolls; the contagion of panic can easily spread, as indeed happened to the Kardakes in this battle. So I put the better cavalry in front, with lighter troops in the second wave; the latter should be able to use their mobility to exploit any breakthroughs created by their predecessors. I left the Colonists at the rear because their morale is the shakiest of all, but they should be able to mop up any remaining resistance through sheer weight of numbers. In practice, of course, it will be unlikely for any but the front units to see action.
Darius’ Infantry Deployment
Following the suggestions in Slingshot, next come the mercenary hoplites, deployed deep, and three units of Kardakes, also deployed in columns. The next lot is another three units of Kardakes, this time deployed in a more usual formation. Unfortunately for the Persians, this is exactly opposite the Companions. I have chosen to represent the Kardakes as mediocre spearmen. Patrick does refer to the Greek source saying they fired a smattering of arrows to no avail as the Companions came forward; my own feeling is that this may just be the usual Greek assumption that the Persians have a massive arrow storm, influenced by previous accounts of earlier phases of the Greek and Persian wars. A literary and historiographical convention, then. However, it is easy enough to allow them to have bows while reducing their fighting values to the equivalent of massed light infantry – the points are exactly the same in Tactica II. This will mean that the Companions may well take a few hits from shooting on the way in, but will carve up the Kardakes in quite spectacular fashion once they hit them. I have not represented the troops further upstream, partly because this scenario represents the majority of the close fighting and the point of decision, but also because the number of figures involved would become prohibitive.
The Thessalians
These performed very well against the massed Persian cavalry, so I have classed them as elite heavies.
The Phalanx
Each division of the phalanx was commanded by one of Alexander’s famous officers; Patrick’s article gives the details. For purposes of the tabletop game, I have placed them under Nicanor, who was in direct command of the Foot Companions (Hypaspists). The latter unit comprises the link between the phalanx proper and the Companion cavalry. I agree with Patrick that the Hypaspists should not be pikemen at this date. The Corinthian League troops form a second line, and should be able to counter any Persian cavalry breakthrough that might occur. In a straight historical refight, they will probably see no action.
The Companions
All three units fight in offensive columns to simulate the wedge formation. Unlike the Persian columns, which simply provide massive numbers, the Companions count the front two ranks in combat. This gives them huge combat power on a narrow frontage. The middle unit should be led by Alexander in person, and gains three bonus combat dice as a result.
The Table-top
Terrain is entirely flat, apart from the river behind which the Persians are deployed. This does not seem to have bothered the Companions very much, although it may have slowed down the heavy infantry. I would suggest that it counts as taking 2” from unit movement, but is not a sufficient barrier to merit a combat modifier as well. Darius placed the Persian levies further upstream, where steeper banks provided a natural obstacle; Alexander simply screened them with the Prodromoi and light troops. The game is scaled at 6 feet deep by six and a half feet wide for 25mm figures. If you want to have slightly wider gaps between units, just increase the width to seven feet.
Army Morale
The Persians break on losing eight units, not counting the light horse. The Macedonian army routs if it loses nine units. Also, this is a fight for the throne of Persia; should either commander-in-chief die, that side loses immediately.
Historical Constraints and Other Possibilities
Alexander advanced all along the line. The Thessalians halted on their side of the river. The phalanx engaged the mass of infantry to their front, holding them in place as the Companions launched their assault on the more shallow Kardakes, routing them and then turning into the flanks of the deep infantry columns. It would seem that the Persian cavalry commander Nabarzanes saw these developments and launched an attack of his own, which the Thessalians managed to contain long enough for the Persian infantry to dissolve in rout, followed by the rest of the army.
The space constraints and relative deployments make other possibilities unlikely. Nabarzanes could be much more offensive with his cavalry, hoping to break the Thessalians early on and threaten the left flank of the phalanx, which would in turn force Alexander to commit the reserve hoplites. Barring the death of Alexander, however, even this is not likely to result in Persian victory. The Persian army deployment seems sensible if one assumes that Alexander would do the same as Darius and place his cavalry downstream. Alexander, of course, did no such thing.
Hydaspes, 326 BCE

Army of Poros - Blue
Left Wing
Chariots: three units of 3 Elite Chariots with missiles
Cavalry: two units of 18 Massed Militia Grade Light Cavalry
Centre
Escort Infantry: three units of 8 SI javs
Elephants: three units of 3 Elephants with missiles
Foot: three units of 48 Militia Grade Medium Infantry with Bows in four ranks
Right
Escort Infantry: three units of 8 SI javs
Elephants: three units of 3 Elephants with missiles
Foot: three units of 48 Militia Grade Medium Infantry with Bows in four ranks
Reserve
Poros with one unit of 2 Elephants with missiles
Right Wing: Alexander and Kleitos
Alexander's Companions: 18 Guard Heavy Lancers in three ranks
Companions: two units of 18 Elite Heavy Lancers in two ranks
Sogdians and Bactrians: two units of 8 Light Cavalry with Javelins
Dahae and Sakae: two units of 8 Light Cavlry with Bows
Centre Right: Krateros
Hypaspists: 48 Elite Heavy Pikemen in four ranks (Seleukos)
Phalanx: two units of 32 Heavy Pikemen in four ranks
Agrianes: two units of 8 Elite SI with Javelins
Archers: four units of 8 SI Bows
Centre Left: Meleager
Phalanx: three units of 32 Heavy Pikemen in four ranks
Greeks: Attalos and Gorgias
Hoplites: 36 Heavy Spearmen in three ranks
Thracians: 18 Superior Light Infantry in two ranks with javelins
Cavalry: 18 Heavy Cavalry in two ranks
Scenario Notes
Terrain
There isn't any. Rather, to be precise, off to the Indian left is an area of muddy going leading to the river itself, which is in full spate due to the monsoons. And off to their right the ground rises perceptibly. The battle takes place in between so, yes, this is another of those ancients battles on a billiard table. To make it more interesting, though, you could model the features I have left off-table for the purposes of my deployment map.
Army Morale
The Indians break on losing nine units, not counting the escort infantry. The Macedonian army routs if it loses six units.
Historical Constraints and Other Possibilities
The Indian deployment presents a historical problem, because it means that all of the elephants are facing Alexander's tough infantry, with their supporting archery occluded. Presumably the torrential rain followed by extreme humidity had something to do with it, but it does leave something of a problem for the historical gamer. If you play the scenario as is, it is almost impossible for the Indians to win, which is itself something of an object lesson, and this is indeed how I have set up the scenario, barring the supposed wide sweeping cavalry moves that may have preceded the main event. Given the historically-based army breakpoints, all the Macedonians have to do is wipe put the vastly inferior enemy chariots and cavalry along with some of the elephants.
To make it much more of an even game, however, try the following suggestion, which is based on some of the ideas of Jeff Jonas in an article on the Indian army at the Hydaspes in Slingshor 297. Although the Indian army command structure is as suggested, it is possible that the Indians conceived of their elephants, escorts and associated blocks of foot archers as something like combined arms divisions - certainly, this is very much the case in the later Mauryan armies associated with Chandragupta. In other words, the centre and right of the Indian army is composed of six 'units' comprising one of escorts, one of elephants and one of foot. Therefore, an elephant unit will not count towards the army breakpoint until its supporting infantry is also destroyed. This does mean that the Macedonians will have to engage at least some of the foot archers, but it should make the scenario a more balanced gaming experience. Other possibilities would be not to include the Indian cavalry in their army breakpoint and/or give the elephants automatic impetus in their initial attack on the Macedonian infantry.
Whatever you do, this should be one spectacular looking battle.
Heraclea, 280 BCE

Right Wing
- 12 Companions: Elite Heavy Lancers with Impetus led by Pyrrhus in person
- Two units of 12 Elite Heavy Horse with spears
- Two units of 12 Peltasts
- 2 Indian Elephants
Centre Right
- 48 Tarantines: Militia Grade Medium Infantry with spears in four ranks
- Two units of 48 Elite Epirotes Phalanxes in four ranks
- Two units of 48 Elite Macedonian Phalanxes in four ranks
- 12 skirmish Slingers
Centre
- Six units of 48 Phalanxes in six ranks
- Two units of 12 skirmishers, one with bows and one with slings
Left Wing
- 48 Tarantines: Militia Grade Medium Infantry with spears in four ranks
- Two units of 8 Italian Light Cavalry with Javelins
- 18 Italian/Greek Settler Medium Cavalry with Spears in two ranks
- 12 Skirmish archers
The Roman Army (in red)
Left Wing
- Two units of 8 Italian Light Cavalry with Javelins
- Two units of 12 Latin Equites: Heavy Cavalry with spears
- An ala of 36 Italian Foot: Medium Infantry with pila in three ranks
The Latin Legions
Four legions, each comprising:
- 12 Velites
- 24 Hastati: Heavy Infantry with pila in two ranks
- 24 Principes: Heavy Infantry with spears in two ranks
- 12 Triarii: Elite Heavy Infantry with spears in one rank
The Roman Legions
Four Legions, each comprising:
- 12 Velites
- 24 Hastati: Heavy Infantry with pila in two ranks
- 24 Principes: Heavy Inmfantry with spears in two ranks
- 12 Triarii: Elite Heavy Infantry with spears in one rank
Right Wing
- An ala of 36 Italian Medium Infantry with pila in three ranks
- Roman Equites: 18 Elite Heavy Cavalry with spears
Scenario Notes
This one is pretty straightforward. I have chosen to start after the initial confused fighting at the river, and after the remnants of the Peltasts have been pulled back and the Romans have crossed the river in good order. I have classified the Tarentines as spearmen, but if you want to make them pikemen, assuming that Pyrrhus has managed to finish training them, they probably should still not be strong enough to take on the legions frontally. The Roman army is a double-sized consular army of four legions with the accompanying Latins and some Italian foot. Pyrrhus does seem to have had a bad time initially against the enemy cavalry, so I have rated the equites (both Latin and Roman) much more highly than is usually the case. This should be a hard fight whoever wins, especially since it is the battle that gave us the term "Pyrrhic Victory".
Bagradas, 255 BCE
Carthaginians: Xanthippos of Sparta - Blue
Right Wing Command
18 Citizen Veteran Heavy Cavalry with spears
18 Gallic Veteran Medium Cavalry with spears
Centre: First Line
Libyans: two units of 12 Veteran Skirmish Infantry with javelins
Baleares: two units of 12 Veteran Skirmish Infantry with slings
Centre: Second Line
Four units of 3 Militia Grade Elephants
Centre: Third Line
Six units of Spanish: 24 Veteran Medium Infantry with pila in loose formation
Centre: Fourth Line
Eight units of City Militia: 24 Militia Grade Medium Infantry with spears
Centre: Fifth Line
Eight units of Mercenary Hoplites: 24 Veteran Heavy Infantry with spears
Left Wing Command
Three units of Numidians: 12 Veteran Light Cavalry with javelins
Romans: Marcus Atilius Regulus - Red
Left Wing Command
Italians: two units of 12 Veteran Medium Cavalry with spears
Centre
Four Legions, each comprising:
- 12 Velites: Veteran Skirmish Infantry with javelins
- Two units of 24 Hastati: Veteran Heavy Infantry with pila
- Two units of 24 Principes: Veteran Heavy Infantry with pila
- Two units of 12 Triarii: Elite Heavy Infantry with spears
Equites: 12 Veteran Heavy Cavalry with spears
Scenario Notes
Unit and Army Morale
To reflect the tenacity of the infantry triple line deployments of both armies, no infantry unit on either side tests morale unless it sees a unit from the third line break. Unless affected by elephants, of course. This was a fight to the bitter end, so either army breaks only when it loses half of its final infantry line.
The Table-top
The map is scaled at 5’ by 8’ for 25mm figures, to reflect the relatively short but deep deployments of the two armies. Adjust accordingly if you are using a different scale.
Historical Constraints and Other Possibilities
To refight the battle as a game with more possibilities, as opposed to a simple replay, permit the outnumbered Roman cavalry to attempt to retire and reform, postponing the fight on the wings for quite a while. The Romans need to try to use their legions in the centre to crunch their way through to the Hoplites and win by destroying half of them before the Carthaginian cavalry completes a double envelopment.
Subscribe to: Posts (Atom)
Post a Comment